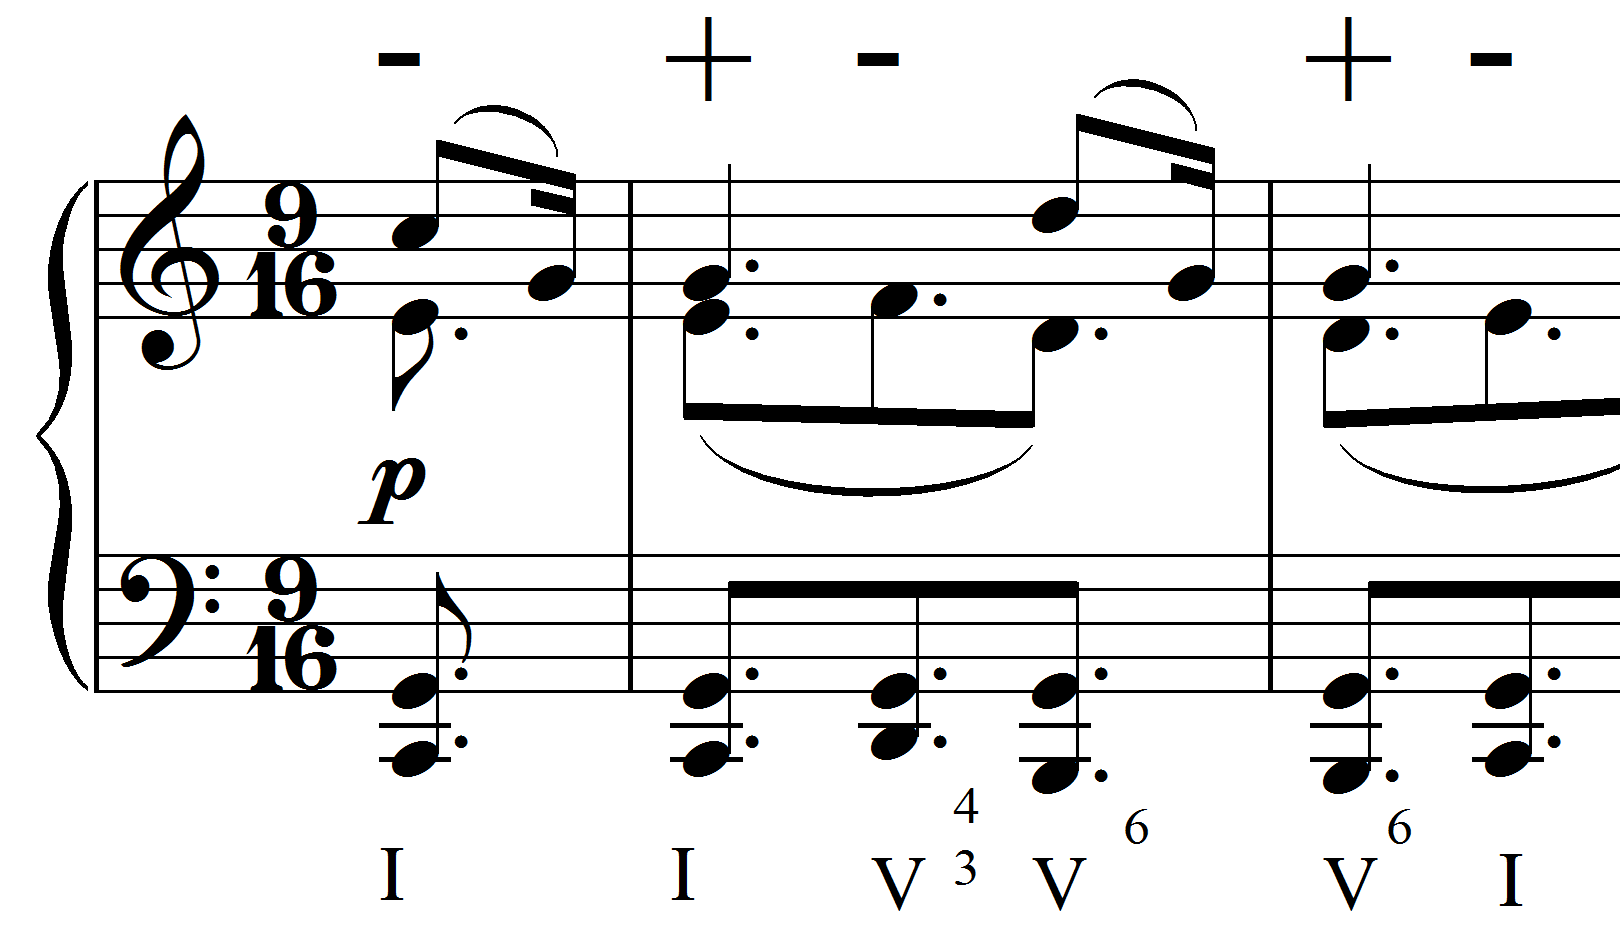
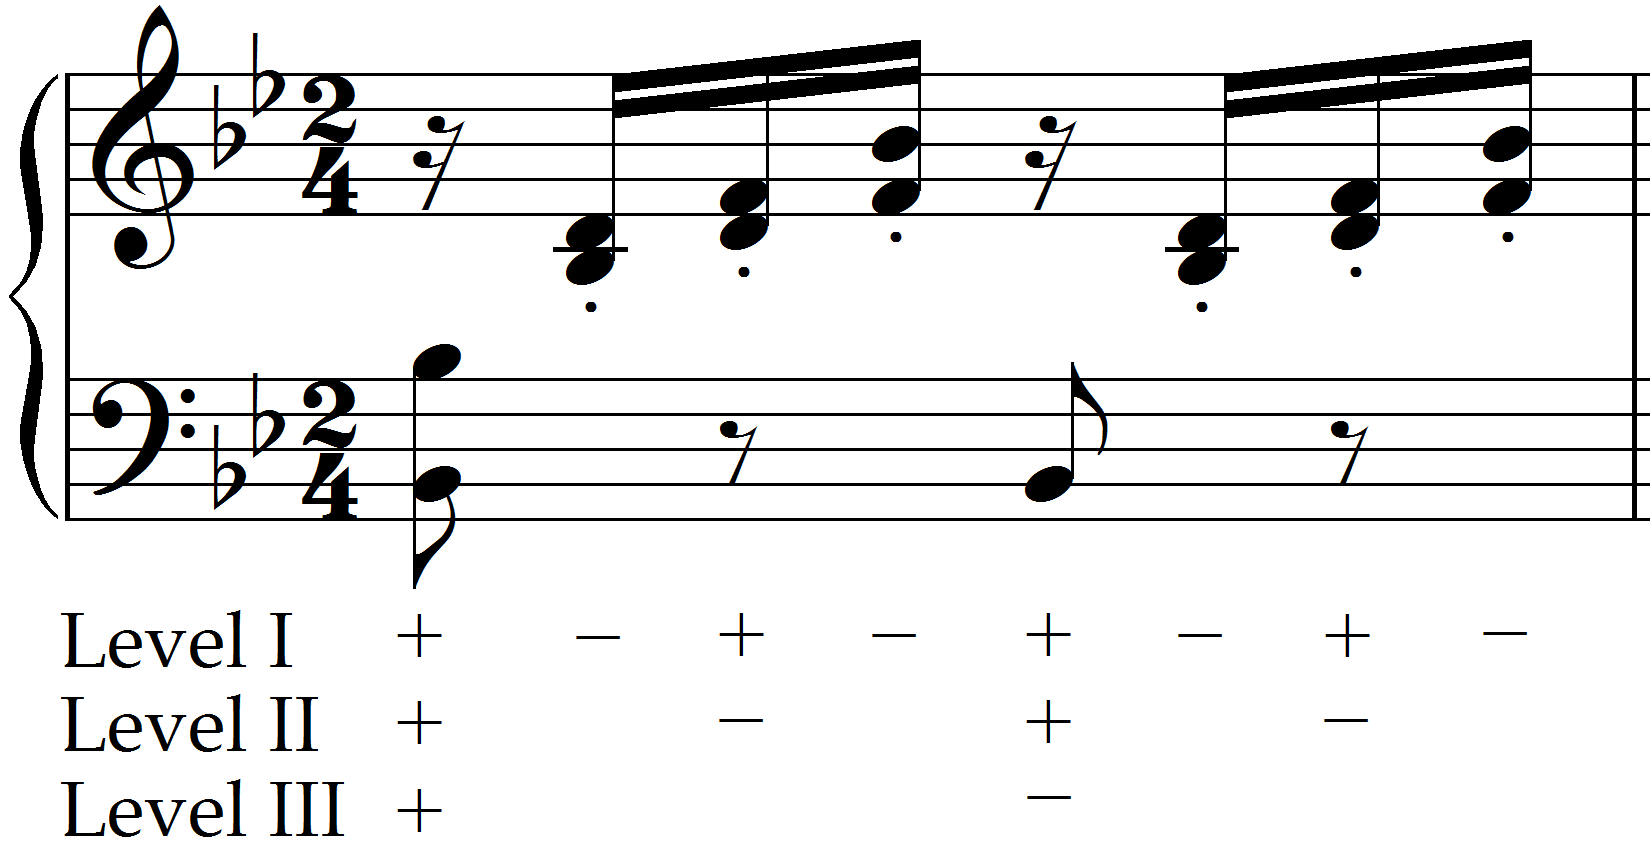
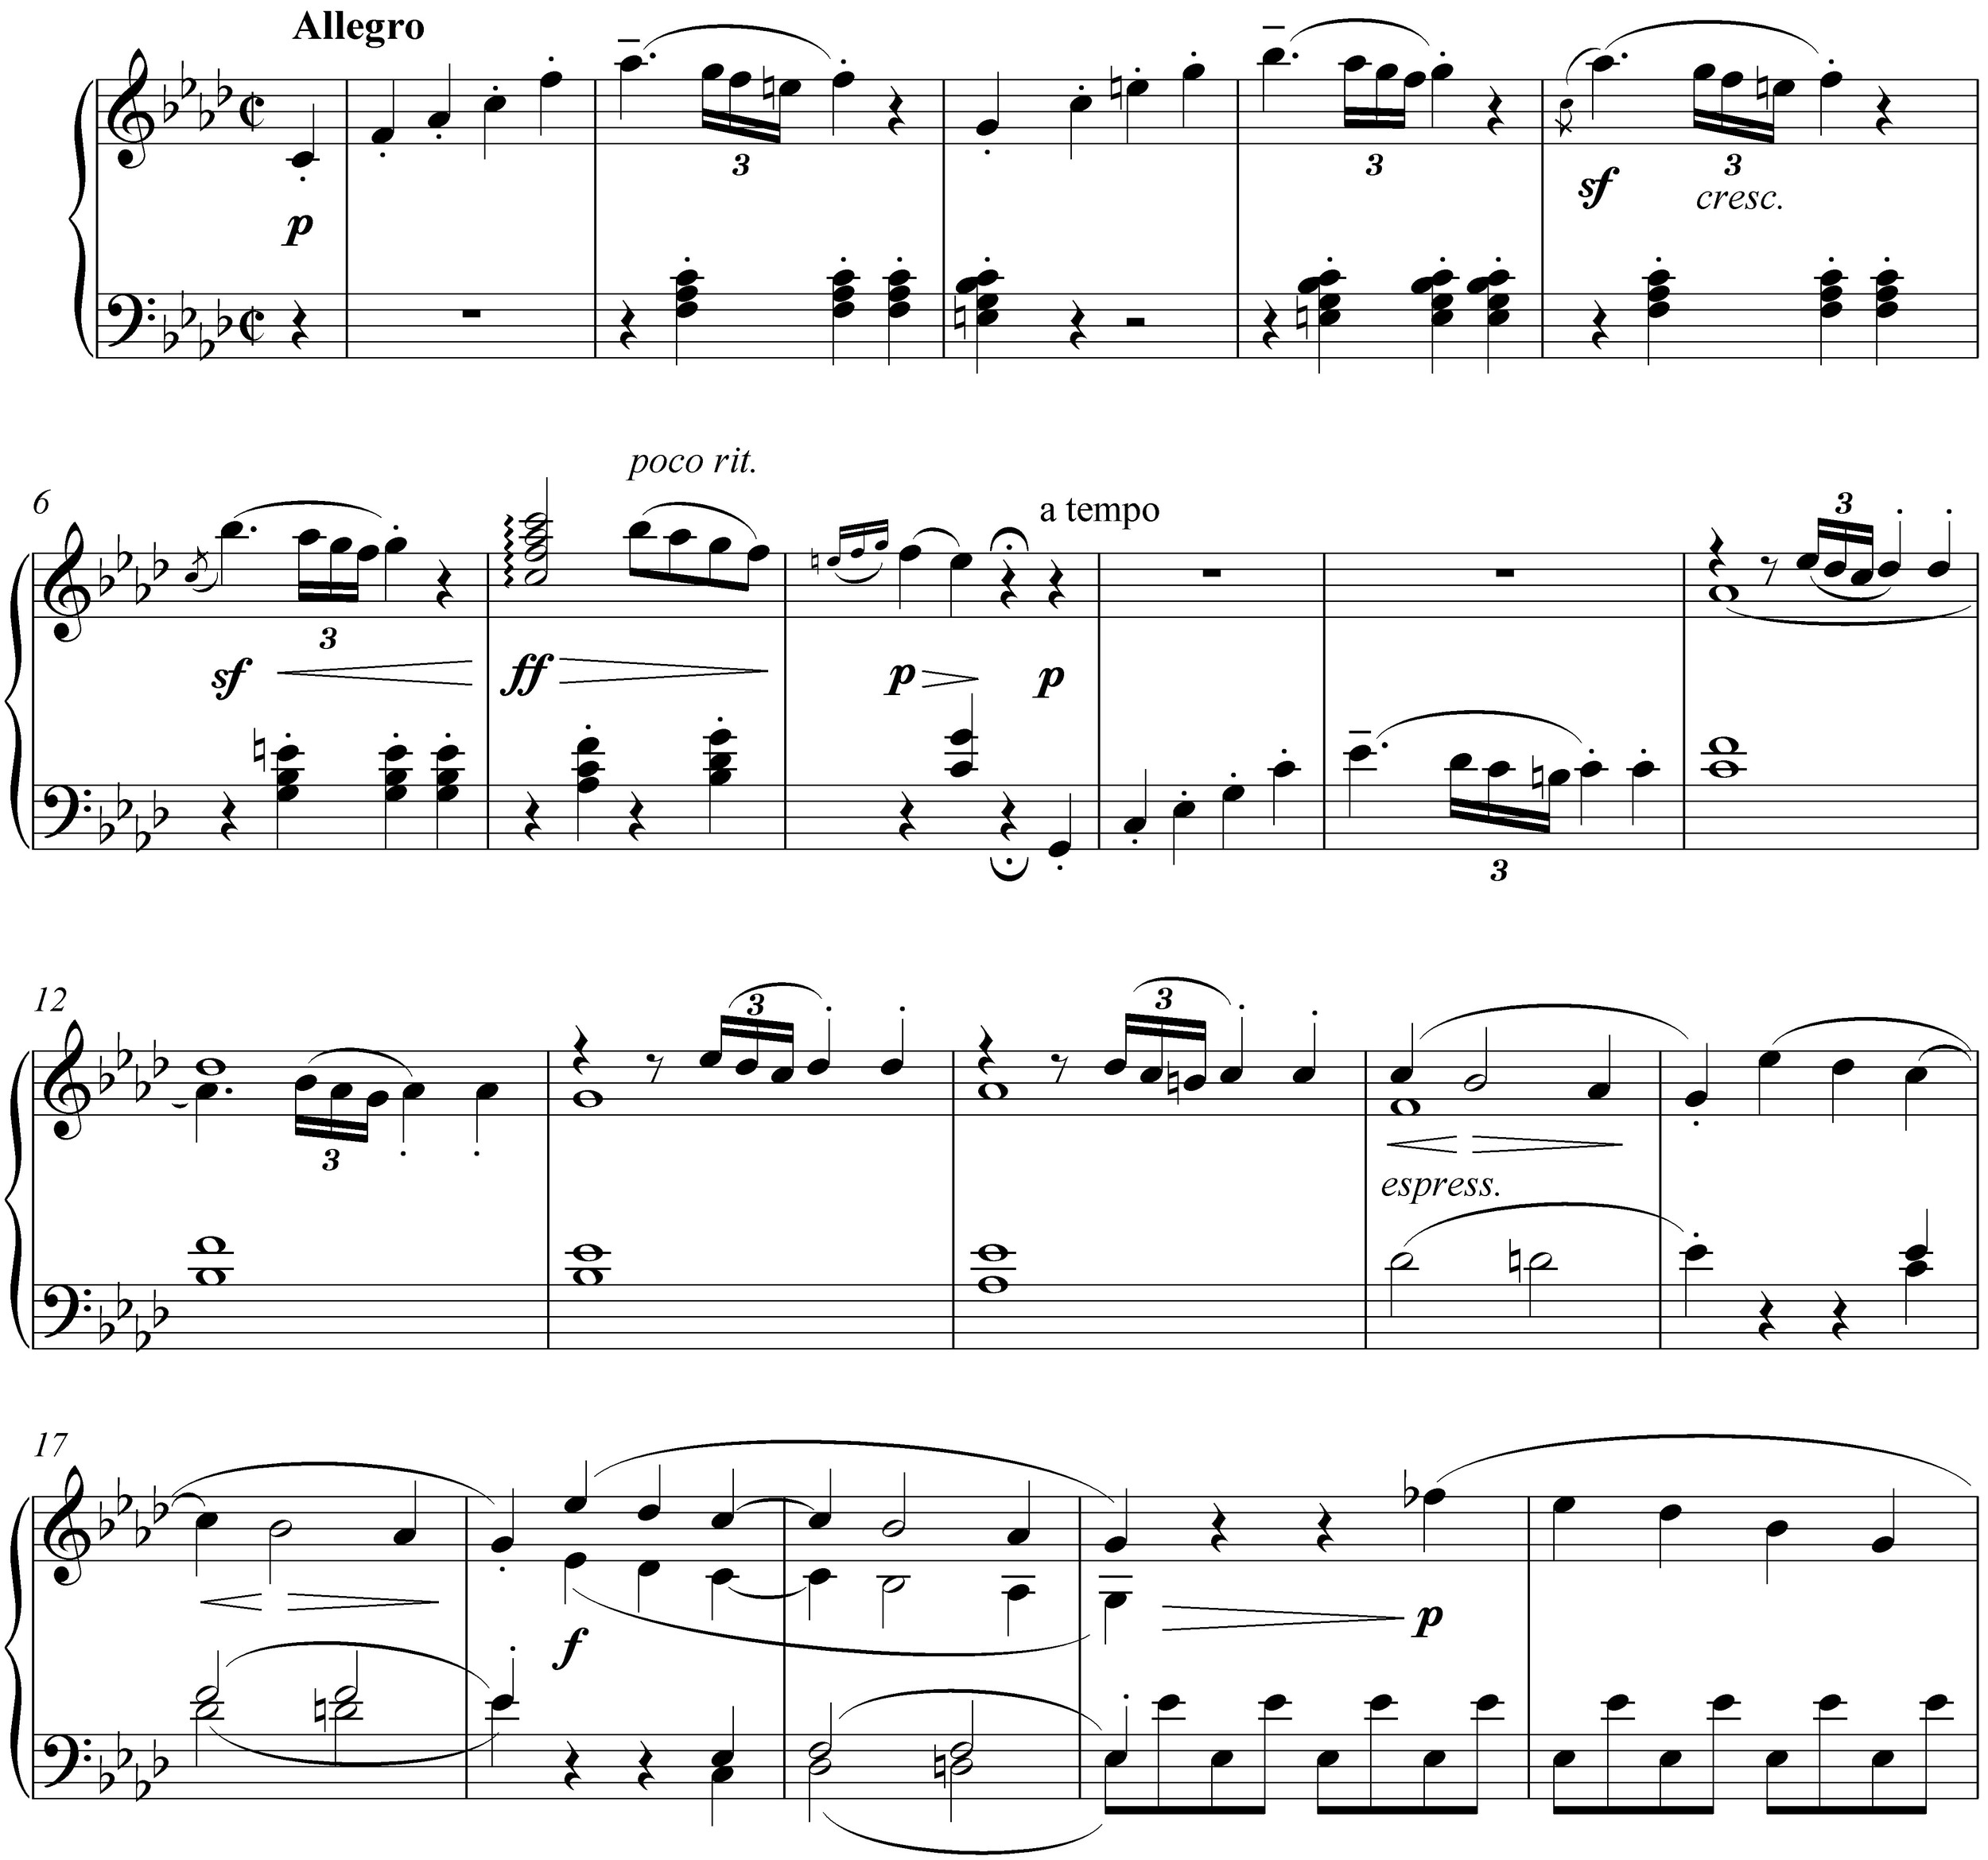
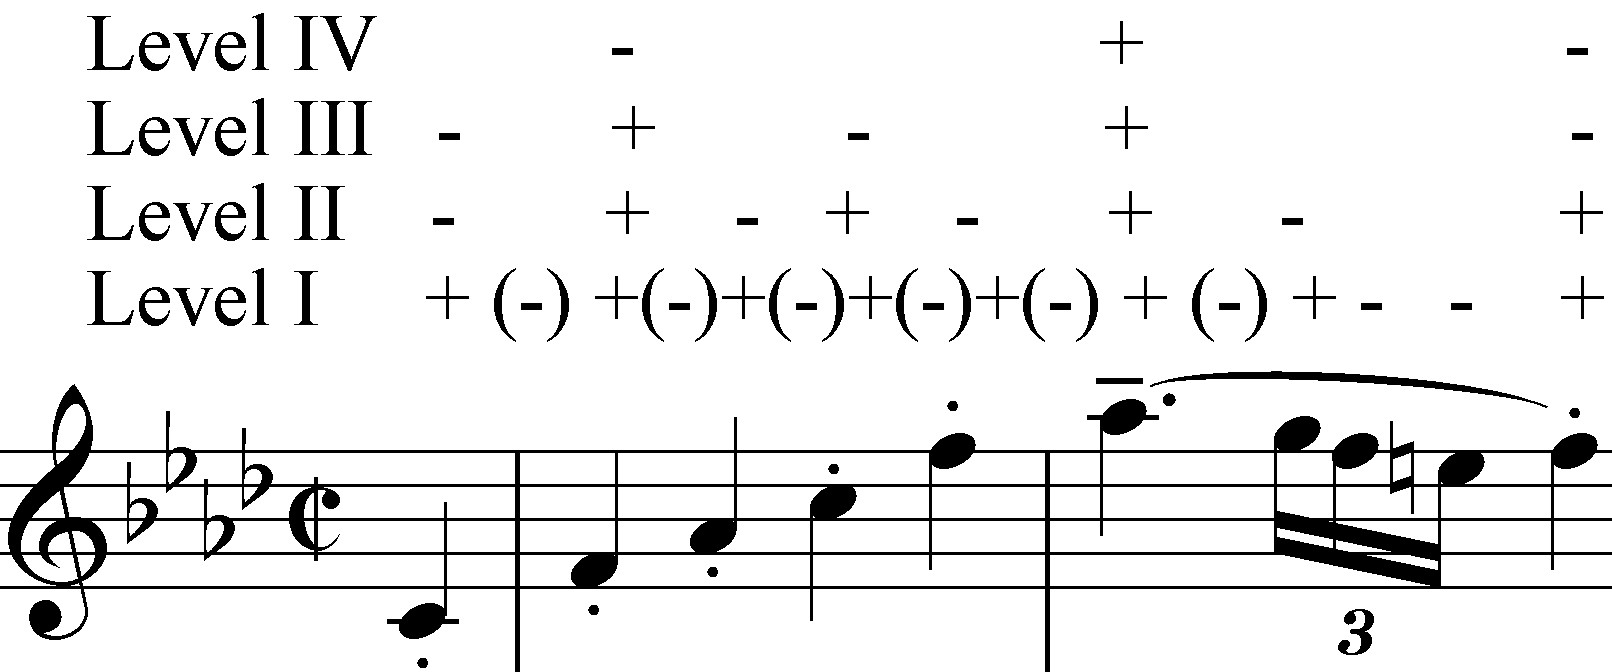
Try out this interpretation of the inner dynamics of the opening gesture, then make up your own throughout the excerpt and realize them.
Applying and Removing Gloss
The most famous of Beethoven interpreters, Artur Schnabel, was a student of Leschetizky. Like all of the legendary Polish pedagogue’s great students, he possesses a warm, translucent, somewhat acquatic tone, quite un-Beethovenian in the modern sense. It lacks the Sturm und drang edge that all of the most well-known modern Beethoven interpreters possess, from Rudolph Serkin to Alfred Brendel to Richard Goode. The modern approach appreciates a certain metallic polish to Beethoven, and I think this is not completely misplaced. Adding a certain polish to the outer edge of Beethoven pianistic creations lends them a certain Fortepiano feeling, and makes the overall effect strong and powerful.
This quality can be achieved by slightly holding the forearms and hardening the fingertips, not so unlike the approach to imitating Horowitz, except that underneath that sound will be more weight than in a typical Horowitz sound. (Remember again that touch involves three parts: the surface of the sound, its body, and its release, which itself can often be separated into the release of the finger and the release of the pedal.)
Try playing the entire excerpt with the sensation that a sound originating in the fingers and hands but connected to the weight in the upper arm, even in pp. Imagine that your fingertips are coated in gold.
Once you become comfortable, remove some of the gloss from the accompanimental layers, but keep the melody in high gloss.
Don’t leave Beethoven without experiencing the other side though. Listen to a Schnabel recording and see if you can imitate his sound. He uses a translucent, matte finish, and the fingertips are warm and breathing.
Defining the Pedaling
Beethoven was the first composer to really begin to understand the Piano and experiment with the realm of its pedals, even as he continued going deaf. Sometimes he errors in his pedaling markings, especially in his latest works, or they’re simply not practicable on the modern Piano with its much greater sustaining power. The spirit, however, of his dynamic marking must always be respected.
The edges in Beethoven need to be clearly pronounced and delineated. The pedal comes up completely quite often. Don’t milk the pedal with a deathly legato; balance dryness with warmth.
The pedaling in our excerpt is very scarce and quite delicate because of its staccato and explosive nature. Even when one could use a quick, deep pedal, such as on the downbeat of the second measure, show restraint because the color of that A-flat needs to ring out clean and clear. You can use a slight brush of pedal on the end of the first beat to briefly warm the sound, but more than that should be avoided.
The first real pedal doesn’t come until the very end of the first large phrase as the melody F descends to E, and even then the pedal should come late so as not to accent that E, which is the resolution of an appoggiatura. Remember always that the Sustaining Pedal is also called the Loud Pedal with good reason.
The following passage should be contrasted with very shallow, more continuous pedals to give a warmer, more feminine and compassionate quality to it. Don’t make the mistake of most pianists though by exaggerating this difference with deep pedals, making it suddenly sound like sentimental rubbish.
Linking and Separating
The driving quality of the initial eight bars precludes the possibility of breathing between the smaller phraselets that make it up. This is because of how Beethoven has realized the accompaniment, constantly thrusting the momentum forward between melodic gestures. The first real pause, the fermata in the eighth measure, is a dramatic one. It needn’t be long for the effect to be strong.
The next phrase begins immediately in tempo, as if nothing had happened, and the accompaniment, although more lyrical, continues to push the melody forward, almost against its own will. Slight punctuations can take place before any or all of the three E-flats in the melody in these five measures (include measure numbers here - mm. 17-20?).
In practice, however, break up this passage into its individual gestures with commas so that each gains its own identity and mental/emotional tightness. Then link them back together. Do this not only for the principal melody, but for the inner layers as well.
Defining Rubato
Rubato in Beethoven is a very tricky subject. Glenn Gould, a bit of a purist when it comes to rhythm, meter and rubato despite his peculiar ideas about tempos, complained that Schnabel equates crescendo with accelerando and diminuendo with ritardando. The modern concept of Beethoven interpretation is to allow as little tempo fluctuation as possible. Wagner, Furtwangler and all the great Beethoven interpreters would have strongly disagreed, lamenting the convent-like approach to modern Beethovenian interpretation. The answer seems to lie somewhere in the middle. Beethoven would have assumed that the sensitive interpreter would gently alter the tempo and exhibit a refined taste for rubato.
This is a delicate and very personal subject, but I’ll offer a few possibilities of rubato to consider as you approach this excerpt. First of all, Schnabel’s inclination to speed up in crescendo and slow down in diminuendo is not childish – it’s completely human and natural. Overusing it belies immaturity, but denying its existence and importance reveals a certain negation of one’s own instincts.
The first significant question to ask yourself is whether to play the first five quarters absolutely in time. Here the answer must be a resounding yes because the listener needs to be brought into the rhythmic nature of the work immediately. Let your rhythmic resolve here be like a rock emanating electricity.
The second question to be resolved is whether to play the triplet figure in the third measure absolutely mathematically. It seems to me that each time the figure appears, it calls out for individuality, without turning it of course into gypsy music. It can be absolutely precise and militant, spread out slightly for emphasis, or clipped excitedly. Listen to what the context tells you.
The third question to consider is whether to make the l.h. accompanying chords absolutely rhythmic, or free. Again, considering the rhythmic, motoric drive of the passage, the rhythm should be emphasized and heightened, not negated. Still there’s slight room, if you’re so inclined, to play with the rhythm, speeding it up impetuously or playing a chord slightly early or late for emphasis.
The fourth question to consider is whether to slightly hold back the downbeats of the fifth, sixth and/or seventh measures to build tension leading into the climax on the downbeat of the seventh measure. The opposite approach can also be taken for a more driven effect.
The next phrase (beginning on the upbeat to the ninth measure) is often taken under tempo. This is dangerous because it’s not easy to get it back successfully in the twentieth bar, the end of our excerpt. My approach is to begin absolutely in tempo with the theme in the l.h. I feel the music wanting to relax and slow, and I give in ever so slightly until it reaches a turning point on the downbeat of measure fifteen. Here it starts to look forward again and wants to gain momentum, in the accompaniment figure especially. I allow myself to gently and gradually take back the slight tempo I had sacrificed in the previous six bars. By the time I reach bar twenty, I’ve hopefully arrived back at the original tempo, even a hair faster.
Try notating rubato into your score using forward and backward arrows, as before.
Differentiating the Texture of Touches
Now your interpretation should be coming into much sharper focus. Each note you play has a certain solidity, depending on how long you hold it in your finger and/or how long you hold it in the pedal. Rather than try to change what you’re doing with your fingers, simply become aware of how long you’re holding your fingers to achieve the effects you want. Notate into your score lightly in pencil above or below each note or group of notes the percentage of held length relative to the length of the note. { If it’s a sixteenth note, for example, and your holding it for have of its value, write .5 . } Remember that you have more leeway in the accompanying figures to play with less solid sounds. As a rule, the more solid the sound, the more it attracts the ear to it; the less solid the sound, the easier it is to hide it in the texture. If you notice that the talea is somewhat monotonous despite great diversity of touch and dynamics, experiment with varying it to create a convincing structure with talea alone. It may help to eliminate your colors and narrow your dynamic spectrum so that the talea comes into relief.
In this Beethoven excerpt, as already mentioned, because of the sparseness of the pedal, what the fingers do is basically what the ear hears – the pedal only occasionally adds in the second dimension of talea, wet talea. In dry talea, even more than wet talea, the precision of the solidity { length } of each note has to be precise and varied. Don’t fall into the trap of many urtext players, making all staccato uniform. Make it your goal to make no two staccatos exactly the same length – let them vary slightly or greatly. Even pizzicato can be short or long, dry or wet.
The Dry Pedal – Finger-pedaling
Continuing the same argument, define your finger-pedaling as precisely as possible. Because of the purity and starkness of much of these twenty measures, especially when it becomes wetter and more expressive in measure eleven, the fingers need to be able to imitate the effect of the pedal and not depend on it; in this way, the pedal can dip in and out shallowly for the sake of color alone, not to help with the legato. The fingers need no pedal at all in this passage. The more you can capture with your fingers alone the real and magical way the pedal blends harmonies and passagework together, the more your pedal will be able to act freely and create numerous additional layers of sound and color that would otherwise be impossible.
As an experiment, play it through without any pedal, trying to imitate the effect of heavy pedaling. Once this becomes comfortable and your right foot stops wanting to suck on the pedal, add in the pedal again.
From the Key Surface or From the Air?
You’re probably already including a certain amount of Height in your attacks, so play through the excerpt simply being aware of the distance between your fingertip and the key-surface on each attack. Which notes do you attack from the air? Which from the key-surface? Which from within the key?
Now experiment with attacking everything from at least a centimeter in the air, but aim for several inches or half-a-foot. Allow yourself to miss notes unapologetically, and think big like Paderewsky or Rubinstein. Don’t show off with the large gestures – rather, embrace the piano with open arms; walk with it in full stride.
After spending even fifteen minutes playing like this, you’ll feel your inhibitions start to fall away. Beethoven, because of his demanding qualities, tends to make the performer crawl in on himself in fear, physically and emotionally. This exercise will open you up again and return you to your fearless nature.
Like before, at first, you’ll miss a lot of notes and your sound will harden, but after a couple days, it will clean up and the sound will round again.
Applying Height Vertically and Horizontally
There are many ways to apply Height vertically and horizontally, and rather than repeat them, I’ll refer you back to the exercises in the corresponding Essay in Part I.
To the Key-bottom or Beyond?
Beethoven requires depth – real penetrating weight from the arms. If you have been only playing to the key-bottom until now, it’s time to dig in deeper.
Applying Depth Vertically and Horizontally
Remember that although relative Depth is not necessarily equivalent to relative dynamic level, it can be helpful to think of it in this way at first. Take your present interpretation of the Beethoven excerpt as is and turn your attention to the Depth. For each note, descend beneath the key-surface, in relationship to the volume desired. For pp, for example, descend one centimeter, for p, one inch, mf three inches, f, six inches, ff, one foot. You may need to use a combination of dropping weight and pushing in strength.
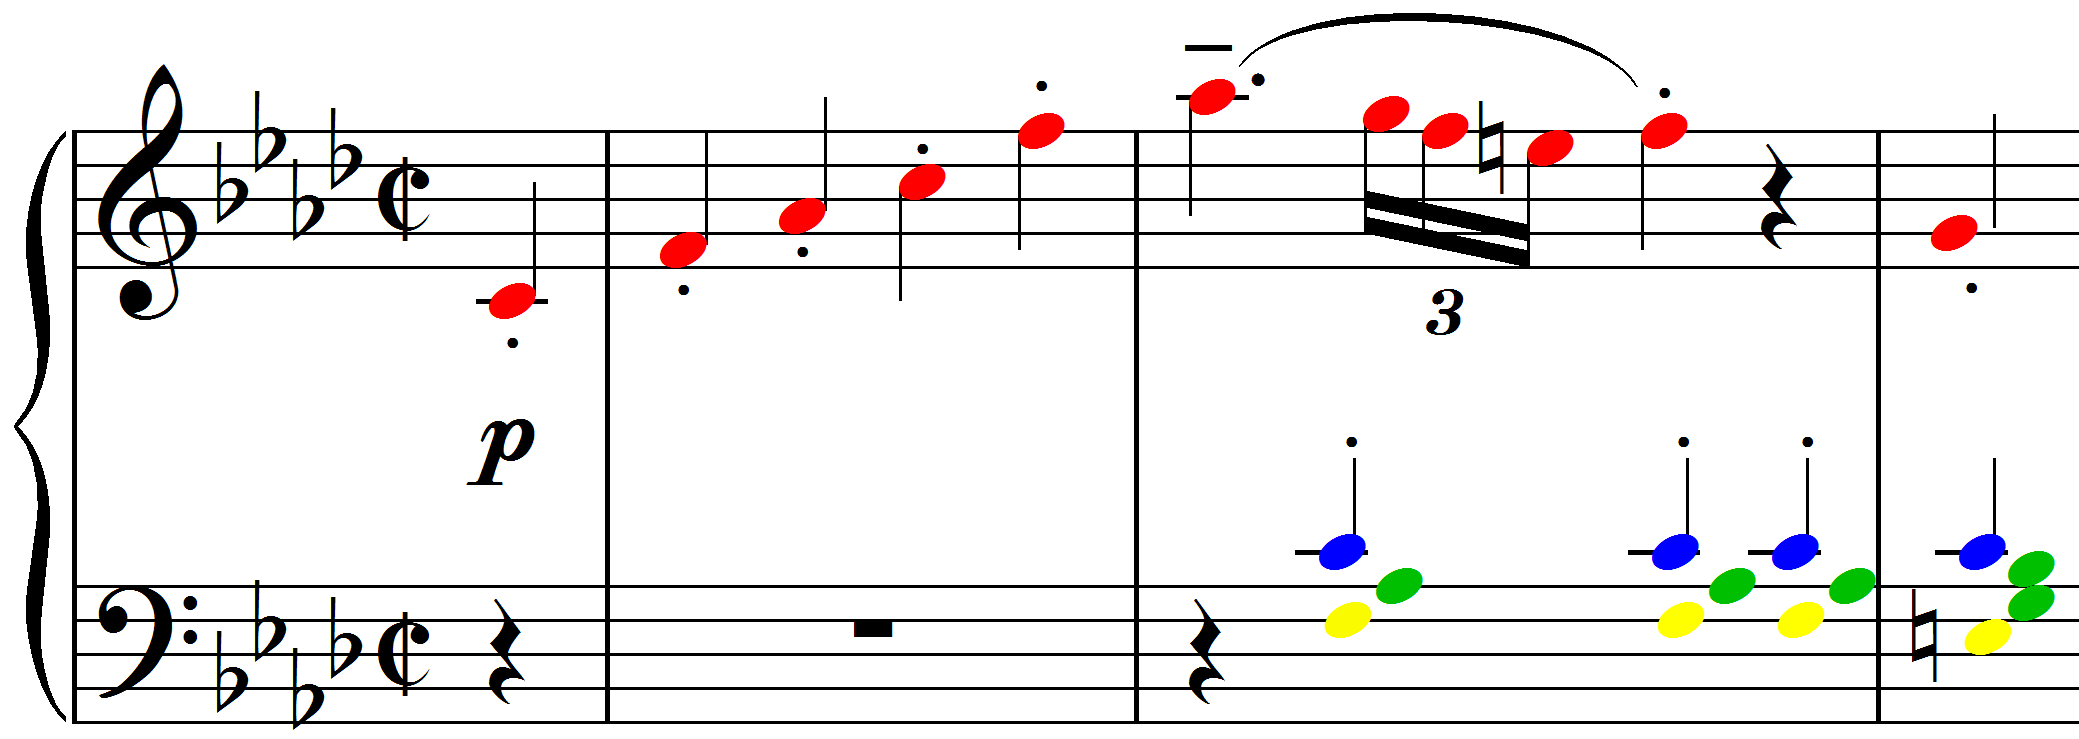
Now try another approach to Height, differentiating color layers. For the moment, set aside the dynamics on the page, and play the top layer, Red, at one foot depth, Royal Blue at six inches, Dark Green at three inches and Dark Blue at one centimeter.
Use the various exercises from the corresponding Filters in Part I to build these layers up gradually.
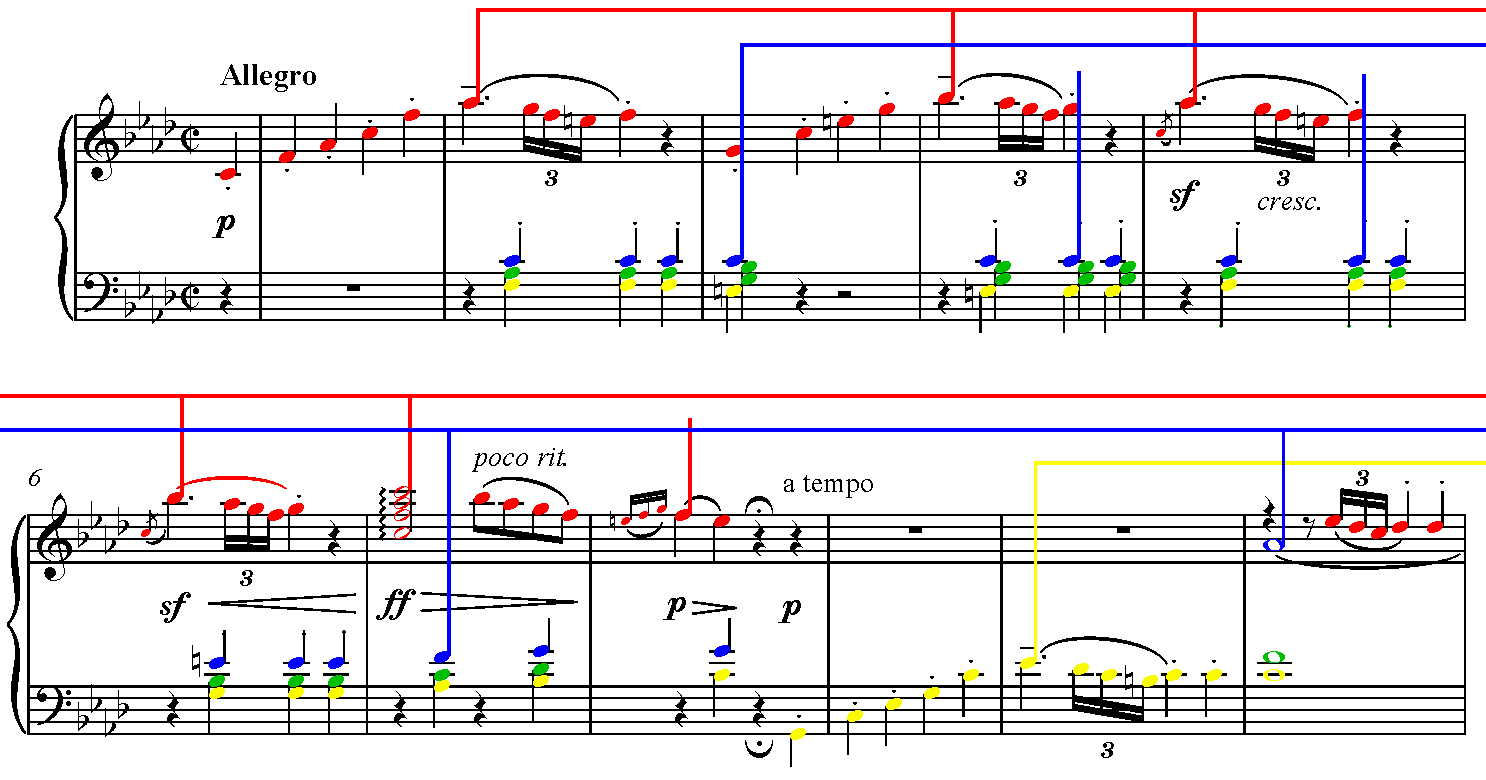
Now approach it from a strictly horizontal point of view, intensifying your connection with each of the Energy Pillars. Separate the energy into two levels for the first ten measures – r.h. and l.h., then separate the l.h. into two layers from bars ten through twenty. Play everything at one centimeter, except the Pillars themselves, which should be as deep and penetrating as possible. The Pillars should be energized physically and emotionally, and be careful to remain sensitive – otherwise, you’re overdoing it and have lost your balance and focus.
Combining and Contrasting Height and Depth
Now you’re ready to combine Height and Depth into one powerful attack. Start from your interpretation as is, following the same principals as above; that is, attack from as high above the key as you intend to descend beneath it. Let your intentions in terms of dynamics guide you.
You will miss more than a handful of notes along the way, but as you gain command of this powerful combined touch, you will possess a penetrating sound with high definition, and you will rarely actually miss once you gain both the skill and the trust in yourself to use it.
Remember, Beethoven is not the antithesis of virtuoso music; it’s not as if his music is pure and Liszt’s, for example, shallow virtuosity and effect. Beethoven was a great virtuoso for his time and his music is often quite virtuosic. Don’t apologize for using a real virtuoso technique to approach his colossal visions.
On Conducting and Studying the Score Away from the Piano
In Beethoven, more than any other composer, the expressive markings are as important as the notes themselves. Every dynamic marking is of crucial importance; every sf is elemental to a good interpretation, every slur key to proper phrasing. I’m an exceptionally careful score-reader, but every time I work through a Beethoven score away from the piano, I discover something I hadn’t ever fully noticed or absorbed before.
There are so many ways to analyze a score, to breath it in and sing it out {Yes, really sing each line in the privacy of your home or the practice room. You needn’t sing loudly, but a real vocal connection to each line in the music is transformational.} When you look at the page without playing, you can easily see the music from a distance and notice certain correlations and contrasts that you might otherwise be too absorbed to notice.
I leave you to the score.
Imagining Real Orchestration
Beethoven, Mozart and Bach are the three composers who were equally comfortable with the Keyboard as they were with the Orchestra. In all of their Keyboard music, there’s a synthesis of the nature of the Orchestra with the nature of the Keyboard. And Beethoven is the only of the three that wrote for the Piano.
If you’re preparing a Beethoven Sonata, take it upon yourself to listen to any of the Symphonies with the score in hand, and notice how the colors are laid out. Listen with the recording until you feel you can work through the score without it. I only recommend using a recording at all for those of you with less-developed score-reading skills. Take the time to read through it singing and gesturing freely at least ten times. Then take it to the Piano and see if you can realize even a phrase or two with your fingers.
Now return to our excerpt and make a few thoughtful choices about certain instruments and instrumental combinations that each layer of sound in each phrase makes you think of. Write your choices into your score. They don’t have to be ideal; don’t fret over them. Assuage your doubts with the Zen adage, first thought, best thought, and see if you can realize your choices away from the Piano in your inner ear, and then at the Piano with your finger-tips. Refer to the Essay in Part I about the techniques used to achieve given sounds.
You will only be able to make the Piano sound like an Orchestra if you have a basic understanding of the actual colors of the orchestra and have developed that understanding to the point that your inner ear can produce the individual sounds and combined sounds that your imagination dictates.
This is a lifelong process – be content with slow progress.
Zen, Circular Energy, and the Four Time Dimensions
Awareness of your own Energy and thought processes is one of the most difficult things to achieve. How do you observe yourself thinking without stopping thinking and acting altogether? The key to self-knowledge of course is experience and practice, but some practice their whole life without meeting themselves or having but a glimpse of their real musical thought processes. Knowing beforehand, however, what you ought to be thinking if the machinery is working properly helps a great deal. This is one of the things I hope this book will help you understand more fully.
Try playing the opening measures of the Beethoven excerpt on a table or on your lap. If you breathe music into it, you’ll have a musical, emotional experience. If you do it dryly, it will only be tapping away. The reason for the difference is simply the breath of musical life. Although it may seem at first that your emotions move in sync with your fingers, you’re actually feeling and hearing the music first, then tapping your fingers in response. Take this to the Piano now. As you play, the first two time-dimensions in place, let your ears open and experience the music singing out of the Piano. Hearing is the Third Dimension. Again, because it happens so fast in a small space, you may have the sensation at first that it’s happening simultaneously, but they are separated in time. If you can, take your experiment to a large space, a larger hall or even a cathedral. The goal in performing is not to listen to the sound of the Piano as it moves out into the hall, but to hear the sound as is bounces back at you. There’s a discernable time difference. The returning sound is much more true to the real sound that the audience experiences.
This also forces you to go beyond yourself. Your first goal is to become the Piano. The second goal is to become the room. The third goal is to become the audience, to absorb them and become one with them. Next allow yourself as you hear the music to let it sink into your being and become a part of you. This is the Fourth Time-Dimension, and I refer to it as the moment after. The danger here is to dwell on it and reflect. The audience has this privilege because they don’t have to keep playing and remain present. You can indulge yourself insomuch as you’re able to continue to be present and keep looking forward. It’s a matter of balance.
The Fifth Time-Dimension, if you will, is the extension of pre-hearing, the Conductor’s dimension. If you’ll recall, the conductor has to inhabit a pre-dimension of time in order to inspire his players to inhabit real-time. He beats about one-sixteenth note before the Orchestra’s real beat, but it’s not a fake beat – he actually inhabits it. At the same time, he listens to the Orchestra and remains with the Orchestra as well. It’s not unlike playing an Organ from the front of a Cathedral which has the pipes in the back. The sound delay can be over a second, yet you can’t wait for the sound to come before you move on; otherwise you’ll indulge in a perpetual ritardando. Instead, you have to inhabit both beats simultaneously.
If you can reach this level of pre-hearing, you’ll literally feel your brain expand beyond its normal limits.
Approach our Beethoven excerpt, challenging your conscious mind to become aware of several dimensions of time-perception at once. See how long you can maintain your awareness without dropping all of the balls. Over time your skills will develop to the point where all the time dimensions seem to return to center, forming one complex, wide beat.
The Four Principle Mallets
To review, the Four Principle Mallets are: the fingertip, the sides of the fingers, the fleshy ball of the finger, and the fingernails. The last of the four, granted, is for special effects, but it’s valuable as a practice tool. The more comfortable you get with it, the more likely you’ll feel comfortable enough choosing to use it in performance.
Using one mallet at a time, work through the Beethoven excerpt. Notice where certain notes or groups of notes sound particularly effective with a given mallet. Go through the score and orchestrate it based solely on the mallets to be employed and see if you can realize your intentions.
The greatest of string players use their bows in the most flexible, expressive ways. If you’re unfamiliar with bowing technique, watching a video of Heifetz playing is an excellent starting point. Watch how he constantly turns the bow and varies its speed and weight.
The mallets correspond to the contact point between the bow and the string. If you turn the bow, the contact point is thinner and more focused. This is like playing on the sides of the fingers. Using full contact of the bow-hairs with the string is like playing with the fleshy ball of the finger. Playing on the fingertip is akin to playing somewhere between these two extremes. In actual performance, the mallets you use will constantly, subtly shift, just like Heifetz’ bow.
Don’t discriminate – all four mallets are Beethovenian.
The Four Physical Levels
Few pianists have even minimal awareness of the separation between the four primary joints that define piano technique. Much attention is given to developing independence of the fingers, but little to independence of the joints.
Take the Beethoven excerpt and play everything exclusively from Level I, the fingers. Next, from Level II, the hand (wrist). Then from Level III, the forearm, and finally from Level IV, the upper arm.
Many approach Beethoven with a finger-and-hand technique, supported by the forearm, but with a passive upper arm. They believe Beethoven’s language ought to be respected through physical restraint.
Where this idea came from I cannot say, and although I must admit that it can be effective in its own way, Beethoven can be so much more if you invite the forearm and upper arm to play an active role. Half of the Orchestra resides in the forearm and the upper arm – why should they be excluded!
As a rule, not only for Beethoven but for all composers, when in doubt about the color desired, use the upper arm. Quick notes obviously can’t be articulated from the upper arm, but even when not using it directly, be sure to leave the elbow unlocked and the upper arm breathing. Remember that it’s always easier to move down in Levels than up.
Another rule of thumb when in doubt: the louder the sound desired, the further up in Level it should be played. This is a less advanced form of Orchestration, but it’s a very natural one and yields consistently orchestral results.
The most advanced form of Orchestration in terms of Levels alone involves the cultivation of each Level separately, from ppp to fff, respecting the individual qualities of that Level in its full dynamic range.
Work through the Beethoven excerpt from each of the Four Levels. Then combine them at will in various combinations.
Finally, work through the score at the Piano or away from it, notating the Level that you intend to use for each note. Again, I use f. for finger, h. for hand, f.a. for forearm and u.a. for upper arm. Practice your Level transcription, making adjustments as necessary. Notating Levels into your score is often as important, even more so, than the actual fingerings. As you increase your awareness of the Four Physical Levels, most technical problems will disappear.
Here’s a simplified example to guide you:


